Custom Documents and Forms Screen
Overview
The Custom Documents & Forms screen is used to generate case-related documents. These documents can be one of two types:
- A “Custom Document”, which is a custom Microsoft Word document populated with data from the case you are working with. YOU can create these documents as you wish and add them to the system so that they can be used on your cases, For more information about creating custom document templates, see Creating Custom Document Templates.
-
A “Form”, is a system generated PDF file populated with data from the case you are working with. (Forms are not “custom”. That is, they come with the MIS Professional application and are maintained by Batesville. Forms are usually government forms, such as the “VA Flag Application Form”.)
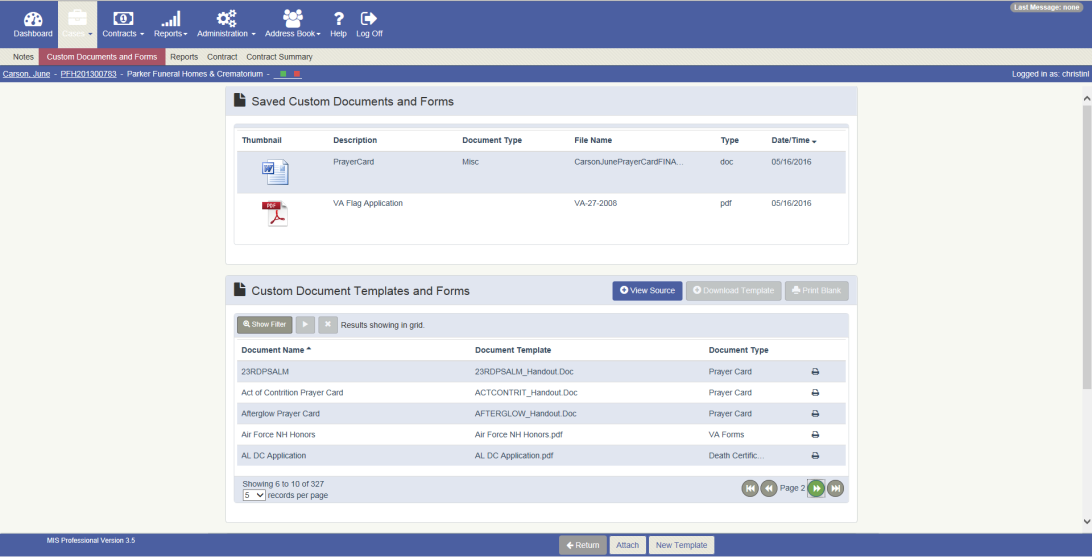
This screen has 3 sections:
- Saved Custom Documents & Forms
- Custom Document Templates & Forms
- Excel Templates
The “Saved Custom Documents & Forms” section of the screen lists custom documents and forms that you have generated previously and have saved to the case. For example, you might choose to save a copy of the finalized prayer cards to the case. You can save custom documents to the case by using the “Attach” button on the footer. Forms are automatically attached to the case as you generate them.
The “Custom Document Templates & Form” section of the screen lists all of the custom documents that you have made available in the system and the system provided forms. (Custom Document templates are loaded into your system using the Handout Selection Code Maintenance screen, which is a screen available from the Administration menu or, you can use the “New Template” button on the footer of the screen).
You can generate a custom document or form by clicking the Printer icon next to each file listed
The Custom Document can be accessed from the Menu bar by navigating to Cases –Artifacts – Custom Documents.
Note: Custom Documents and Forms can be generated only for At-Need and Pre-Need cases. This screen is accessible for Miscellaneous Sale cases only so that Excel Statements can be generated.
Workflow
To generate a custom document or form:
Click the printer icon next to the custom document or form that you want to print.
- If you selected a custom document (files with a .doc or .docx extension), your browser’s file download program appears. Open or save the file locally. You will see data from the case you are working with merged into the template.
- If you selected a form (files with a .pdf extension) the form viewer popup with appear on the screen. You can print the file, or save it locally. You will see data from the case you are working with merged into the template. Note: Forms are automatically attached to the case as they are generated. You will see these from the following areas of the application
- In the Saved Custom Documents & Forms widget at the top of the screen
- In the Case Images & Attachments widget on the Case Summary screen
- On the Case Images & Attachments screen
To attach a custom document to the case:
- Generate the custom document (see above),
- Make any desired changes to the document.
- Save the document locally.
- Click the “Attach” button on the footer. The Document Information popup appears.
- Click the “Upload Document” field to browse to and select the document.
- Complete the “Description” and “Document Type” fields.
- Click Save. The document is added to the Saved Custom Documents section of the screen.
To open a saved custom document:
- Navigate to the Custom Document & Forms screen for the desired case.
- Select the row that contains the desired document from the Saved Custom Documents & Forms section of the screen. The Document Information popup appears.
- Click the document icon.
- Open or save the document using your browser’s file download feature.
Or
- Navigate to the Custom Document screen for the desired case.
- Click the “thumbnail” (document icon) for the desired row.
- Open or save the document using your browser’s file download feature.
To delete a saved custom document:
- Navigate to the Case Image & Attachments screen for the desired case.
- Select the row that contains the desired document from the Saved Custom Documents section of the screen. The Document Information pop-up appears.
- Click the “Delete” button.
- Click “Delete” on the confirmation message.
To open / save the data source file:
- Navigate to the Custom Document & Forms screen for the desired case.
- Click the “View Source” button in the Custom Document Templates section of the window.
- Open or save the document using your browser’s file download feature.
To open / save a copy of the template document:
- Navigate to the Custom Document & Forms screen for the desired case.
- Select the desired row in the Custom Document Templates section of the window.
- Click the “Download Template” button.
- Open or save the document using your browser’s file download feature.
To upload a new template to use:
- Navigate to the Custom Document & Forms screen for any case.
- Click the New Template button on the footer. The Template Information pop-up screen appears.
- Browse to and select the template.
- Define the other fields on the pop up screen.
- Click Save.
- Refresh your browser to see the new template in the list. This template will be available on all cases.
Note: You can upload a new template by using the Handout Selection Code Maintenance screen. You can upload files that have a DOC or DOCX file extension. If you want to inactivate a template, you would need to do this in the Handout Selection screen.
To print a blank form:
- Navigate to the Custom Document & Forms screen.
- Select the desired PDF form in the Custom Documents & Forms grid.
- Click the “Print Blank” button.
Regarding Date Data Tags with 2 Digit Year for "View Source" in Excel:
When using "View Source" to view insert merge fields in Excel, date data tags with a 2 digit year may be displayed incorrectly.
For Example the following dates are entered for the respective data tags:
Birth_Date_MMDDYYYY
01/23/1923
Birth_Date_MMDDYY
01/23/23
In the second data tag only 23 is retrieved for the year. However, when we view it in Excel, Excel converts this date to 01/23/2023, as it is trying to display it in default MM/DD/YYYY format.
This issue is caused by how excel interprets 2 digit years.
- 00 through 29 is interpreted as the years 2000 through 2029. For example, if we type the date 5/28/19, Excel assumes the date is May 28, 2019.
- 30 through 99 is interpreted as the years 1930 through 1999. For example, if we type the date 5/28/98, Excel assumes the date is May 28, 1998.
Reference: https://answers.microsoft.com/en-us/office/forum/office_2010-excel/how-do-i-stop-excel-from-automatically-changing/4fd23d46-f39d-4c93-b96c-b1efb9ce9f91
- This link clearly mentions that for year values to be interpreted as we intended, year values should always be entered in four digits (for example, 2001, not 01)